What is the Floorplanner Tool In SketchUp?
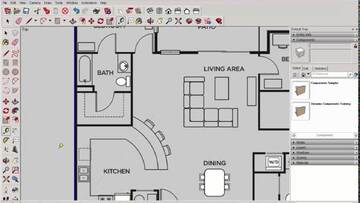
The SketchUp Floorplanner tool allows users to develop and design comprehensive floor plans for architectural and interior design projects. It is a strong tool for visualising and laying out areas within a building. Users may use the Floorplanner tool to draw walls, specify room size, add doors and windows, and even include furniture and fixtures to create a realistic floor plan.
The Floorplanner Tool in SketchUp is a 2D drawing tool that allows you to create floor plans. It is a free tool that is available to all SketchUp users. The Floorplanner Tool has a number of features that make it easy to create floor plans.
The application provides several customization possibilities, allowing users to edit and improve their floor plans to meet their individual design needs. Whether you are an architect, interior designer, or house owner, SketchUp's Floorplanner tool makes it simple to bring your design ideas to reality.
How to install the Floorplanner Tool in SketchUp?
The Floorplanner tool is not a native tool within SketchUp. However, you can still create detailed floor plans in SketchUp using its built-in tools and features. Here is a step-by-step guide on how to create floor plans in SketchUp:
1. Launch SketchUp: Open SketchUp on your computer. If you don't have SketchUp installed, you can download it from the official SketchUp website and install it following the provided instructions.
2. Set up the workspace: Once SketchUp is open, customize your workspace by arranging the toolbars and panels to your preference. You can access the necessary tools from the default toolbars like the Drawing, Modify, and Entity Info toolbars.
3. Start drawing the floor plan: Begin by selecting the Line tool from the toolbar or by using the keyboard shortcut "L." Use this tool to draw the outline of the walls of your floor plan. Click at each corner of the room, and SketchUp will automatically create edges to connect them.
4. Adjust dimensions: To define the dimensions of your walls, select the Tape Measure tool from the toolbar or use the keyboard shortcut "T." Measure the length of the walls by clicking on one corner and dragging the measurement line to the other corner. Enter the desired dimension and hit Enter to apply it.
5. Add doors and windows: Use the Rectangle tool or the Circle tool to draw the openings for doors and windows. You can specify the dimensions of these elements by using the same measuring techniques mentioned earlier. To create a door or window, draw a rectangle or circle, and then use the Push/Pull tool to extrude the shape to the desired depth.
Read more
~~~~~~~~~~~~~~~~~~~~~~~~~~~~
Published By
Global Associates
www.sketchup4architect.com
~~~~~~~~~~~~~~~~~~~~~~~~~~~~
Published By
Global Associates
www.sketchup4architect.com
~~~~~~~~~~~~~~~~~~~~~~~~~~~~
 RSS Feed
