SketchUp is a wonderful modeler for architects and designers and the new version of SketchUp has also come with new features for us. SketchUp 8 is a 3D modeling program that known as Google SketchUp in earlier. This program is also available in a fully useful free version and also the Pro version is available that has more features. This software helps the users in their business that deals regularly with the perfect modeling objects like in the architectural or design fields. Besides creating the users own components, the software also have pre-built models that can be resized as per the needs. Those newly created components could be resized with the Tape Measure tool and the other pre-built components can be altered with the scale tool.
Resizing pre-built components:
1. At first the SketchUp should be launched and then click on “Choose Template” from the Splash screen. The selected template determines the measuring units for the objects and components.
2. Then click “Start using SketchUp” button after selecting a template which can be the match of the required measuring units.
3. Next click on “Window” option form the Menu Bar and click “Components” for viewing the Components window.
4. Select the components for setting the starting point and then click on it for placing it on the main SketchUp screen.
5. Now click on Tools < Dimensions. After that the cursor will be turned in a purple dot that can be moved over the document that wants to resize.
6. After that click on the section of the components for setting the starting point of the dimension and click to place the endpoint. Sketchup will quickly display the dimensions for the selected distance.
7. Next click Tools>Scale from the Menu bar and click the component wished to resize.
8. At last click and drag one of the scaling grips for resizing the component.
Resizing newly created components:
1. At first launch SketchUp and then click on “Choose Template” from the splash screen. The selected template determines the measuring units for the objects and components.
2. Then click “Start using SketchUp” button after selecting the matching template with the required measuring units.
3. Then click on “File”>Open from the menu bar for selecting the resized components.
4. Now select the Tape measure tool from the toolbar and click anywhere for selecting the starting point of measurement.
5. Then move the cursor and select the ending point of the measurement.
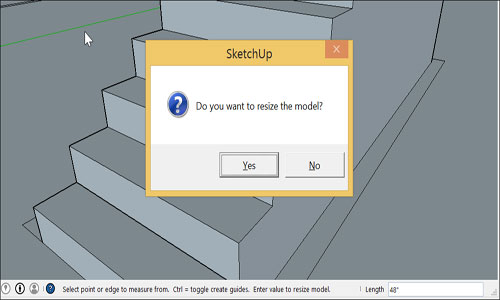
6. Next type a new length for the measurement from the Measurement toolbar and press “Enter”.
7. Then only click “Yes” at the prompted time and the component will automatically take the measurement.
For more information please visit smallbusiness.chron.com
Resizing pre-built components:
1. At first the SketchUp should be launched and then click on “Choose Template” from the Splash screen. The selected template determines the measuring units for the objects and components.
2. Then click “Start using SketchUp” button after selecting a template which can be the match of the required measuring units.
3. Next click on “Window” option form the Menu Bar and click “Components” for viewing the Components window.
4. Select the components for setting the starting point and then click on it for placing it on the main SketchUp screen.
5. Now click on Tools < Dimensions. After that the cursor will be turned in a purple dot that can be moved over the document that wants to resize.
6. After that click on the section of the components for setting the starting point of the dimension and click to place the endpoint. Sketchup will quickly display the dimensions for the selected distance.
7. Next click Tools>Scale from the Menu bar and click the component wished to resize.
8. At last click and drag one of the scaling grips for resizing the component.
Resizing newly created components:
1. At first launch SketchUp and then click on “Choose Template” from the splash screen. The selected template determines the measuring units for the objects and components.
2. Then click “Start using SketchUp” button after selecting the matching template with the required measuring units.
3. Then click on “File”>Open from the menu bar for selecting the resized components.
4. Now select the Tape measure tool from the toolbar and click anywhere for selecting the starting point of measurement.
5. Then move the cursor and select the ending point of the measurement.
6. Next type a new length for the measurement from the Measurement toolbar and press “Enter”.
7. Then only click “Yes” at the prompted time and the component will automatically take the measurement.
For more information please visit smallbusiness.chron.com
~~~~~~~~~~~~~~~~~~~~~~~~~~
Published By
Arka Roy
www.sketchup4architect.com
~~~~~~~~~~~~~~~~~~~~~~~~~~
Published By
Arka Roy
www.sketchup4architect.com
~~~~~~~~~~~~~~~~~~~~~~~~~~
 RSS Feed
